Getting Started with Substation
Welcome. Take a breath.
If you're coming from Horizon or the OpenStack CLI, Substation will feel different for about ten minutes. The navigation works like vim meets Spotlight - you type what you want, and the app figures out what you mean. This sounds strange until it clicks, and then you'll wonder how you ever managed clicking through web interfaces.
Let's walk through your first session together.
Before You Begin
You'll need Substation installed and your OpenStack credentials configured. If you haven't done this yet:
- Installation Guide - Docker, pre-built binary, or build from source
- Configuration Guide - Set up clouds.yaml with your credentials
The quick version: Docker is easiest, or grab the binary and drop it in /usr/local/bin. Your clouds.yaml goes in ~/.config/openstack/ with mode 600. The installation guide has the complete details.
The Mental Model
Here's what's different: Substation uses command input as the primary navigation method. You press colon, type what you want, and go there. Press colon and Tab, and you'll see everything available. Type :serv and Tab will complete it to :servers. Make a typo like :servrs and it'll suggest the right command.
This feels awkward for about ten minutes. Then it becomes second nature, and you'll navigate faster than you ever did clicking through menus. The interface teaches itself - Tab completion shows you what's possible, command history (up arrow) reminds you what you've done, and fuzzy matching forgives your typos.
The traditional navigation still exists - arrow keys, menus, mouse support - but command input is where the power lives. Give it those ten minutes.
Your First Session
Start Substation with your configured cloud:
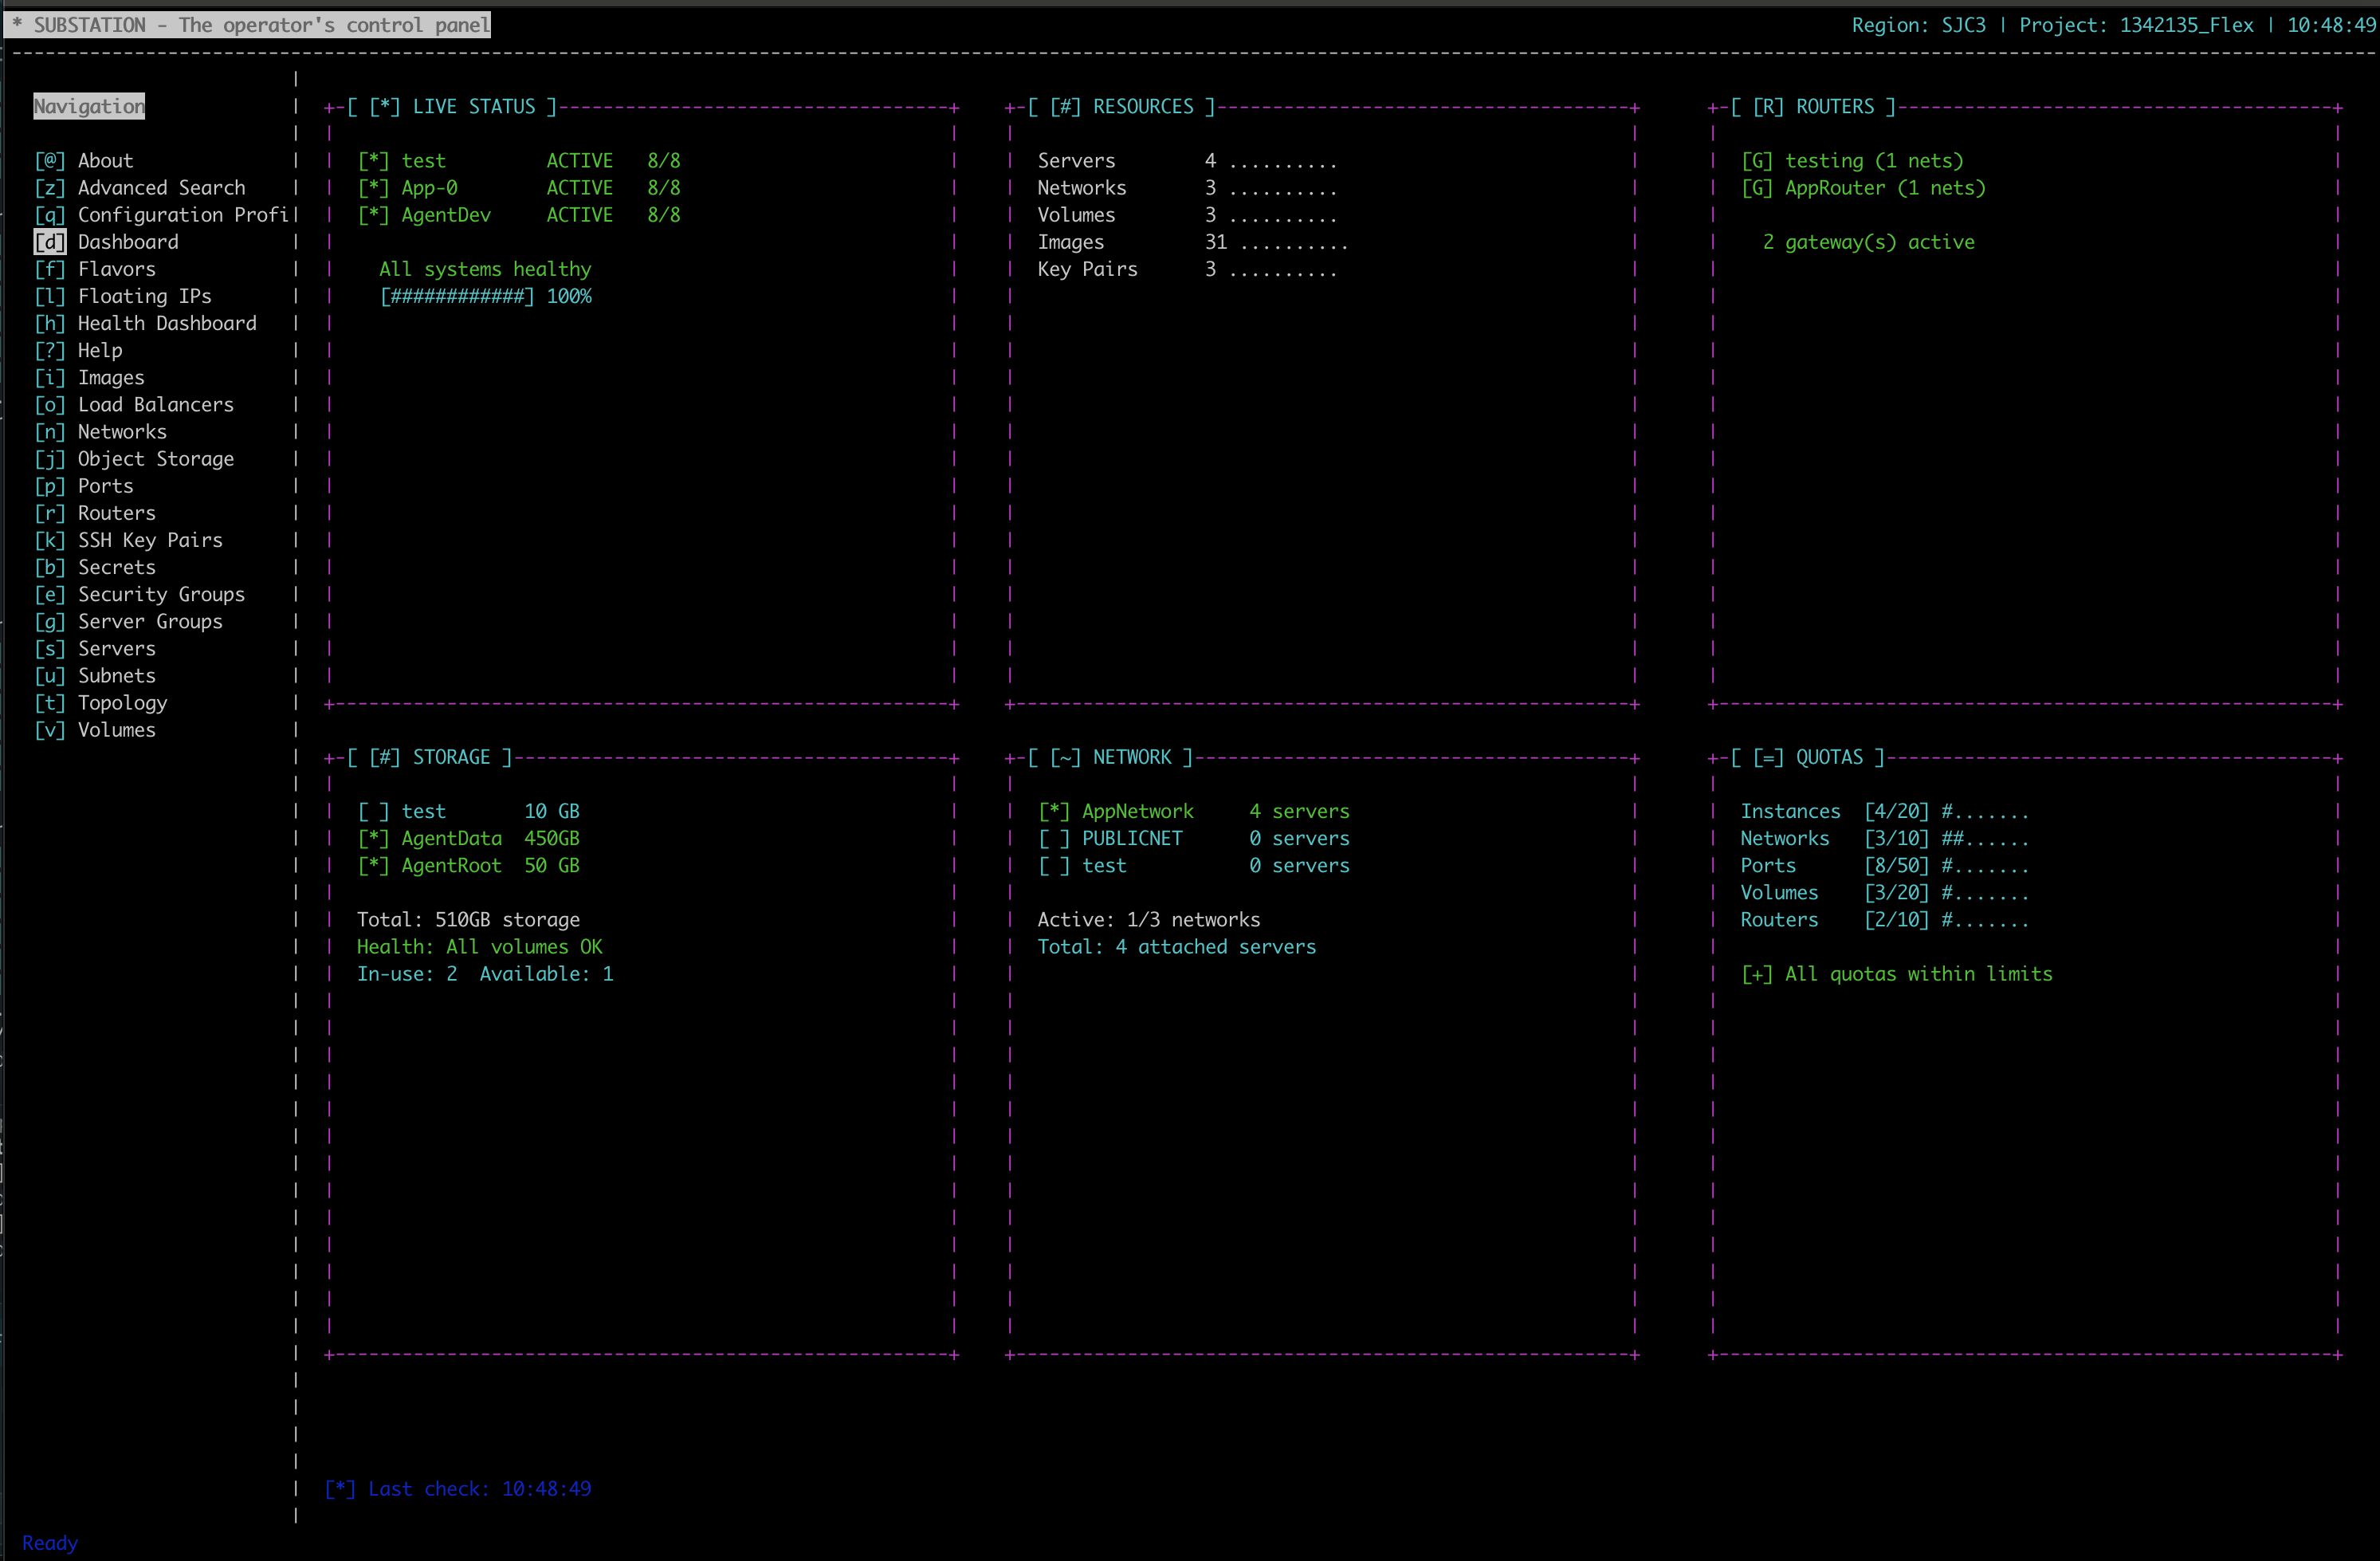
You'll see the dashboard load in phases. Critical resources like servers and networks appear first, usually within a second. Secondary resources like volumes and images follow. Then the expensive stuff - ports and security groups - fills in over the next few seconds. This phased loading means you can start working immediately while the rest catches up.
Now press colon. You're in command mode. Press Tab. See that list? Those are all the places you can go and things you can do. Don't memorize them - you'll learn by using them.
Type :servers and press Enter. You're now looking at your compute instances. Use arrow keys (or j/k if you're vim-inclined) to move through the list. Press Space or Enter on any server to see its details. Press Esc to go back.
That's the pattern: colon to command, type where you want to go, navigate with arrows, Space to drill in, Esc to go back. Everything else builds on this.
Understanding What You See
The dashboard shows resource counts, recent activity, service health, and performance metrics. Those numbers at the top - servers, networks, volumes, images - are your quick sanity check that your cloud is responding. The cache hit rate tells you how often Substation avoids hitting the API. Above 60% is typical after a few minutes of use.
When you navigate to a resource view like :servers or :networks, you see a list. The columns show what matters most for that resource type. Servers show name, status, IP addresses, flavor. Networks show name, status, subnets, whether they're external. These views are designed for scanning and quick decision-making.
Details views give you everything - all attributes, all metadata, formatted for reading. You don't need details most of the time, but when you do, Space gets you there instantly.
The Learning Curve
We all remember our first session with a command-driven interface. You keep reaching for the mouse and then stopping yourself. By the end of that session, you're hooked. Here's the path most people follow:
Week one: Use full command names. Type :servers, :networks, :volumes, :images. Press Tab liberally. Look at what's available. Command input will feel deliberate and slow, but you're building muscle memory.
Week two: Start using shorter aliases. :srv instead of :servers, :net instead of :networks. You'll still be deliberate, but faster. You're probably not reaching for the mouse anymore.
Week three and beyond: The really short aliases become natural. :s, :n, :v. Command input is now faster than any menu system ever was. You're typing commands before you finish thinking them.
The interface stays discoverable through all of this. Tab completion always shows you what's possible. Help (press ?) adapts to your current view. Nothing is hidden.
Common First-Day Tasks
Let's say you need to check on your servers. You've launched Substation, you're at the dashboard. Press colon, type :servers, press Enter. There's your list. Arrow down to the server you care about, press Space, and you're reading its details. Status, IP addresses, flavor, image, when it was created, when it was last updated. Press Esc when you're done. That's it.
Or you need to create a new server. From anywhere, type :servers to get to the servers view. Then :create to open the creation form. Fill in the name, select a flavor (use Tab to see choices), select an image, select a network. Press Enter when you're ready. You'll see the server appear in the list with status BUILD, then watch it change to ACTIVE when it's ready. Real-time updates, no refresh needed.
Searching for something specific? Local search with slash works in any list view - it filters what you see as you type. For searching across everything, use :search or :find or just :z. Type your query, press Enter, and you'll get results from Nova, Neutron, Cinder, Glance, Keystone, and Swift. Usually under half a second.
Need to restart a server? Navigate to it in the servers list, then :restart. Want to delete something? Select it, then :delete. Context-aware commands mean :create, :delete, :start, :stop all work where they make sense. The interface won't let you :start a network or :delete something you haven't selected.
If your data looks stale, :cache-purge clears everything and forces fresh pulls from the API. Then :refresh reloads your current view. Use this sparingly - the cache exists to keep things fast - but when you need it, it's there.
When Things Go Wrong
Authentication fails? Check that your auth_url ends in /v3 and includes domain fields. Run with --wiretap to see exactly what's being sent.
Everything seems slow? It's probably your OpenStack API, not Substation. Enable wiretap and check the response times in the logs. Most operations should complete in under 200ms. If you're seeing seconds, that's your infrastructure.
For detailed troubleshooting, connection debugging, and performance tuning, see the Troubleshooting Guide.
What's Next
You know enough now to be productive. Navigate with command input, drill into details with Space, search with slash or :search, create and manage resources with context commands. The rest is refinement.
When you're ready to go deeper:
- Common Workflows - Everyday operations and patterns
- Keyboard Shortcuts - Complete navigation reference
- Performance Tuning - Cache settings and optimization
- MemoryKit API Reference - How the multi-level cache reduces API calls
- OpenStack Integration - Supported services and operations
Press ? at any time for context-aware help. Check ~/substation.log if something seems wrong. And remember: command input felt weird for ten minutes. Now you're on the other side of that curve.
Quick Reference
Essential Commands:
:dashboard  (:dash, :d)         Return to overview
:servers    (:srv, :s)          Compute instances
:networks   (:net, :n)          Virtual networks
:volumes    (:vol, :v)          Block storage
:images     (:img, :i)          OS images
:search     (:find, :z)         Cross-service search
:refresh    (:reload)           Reload current view
:cache-purge (:clear-cache)     Clear all caches
:help       (:?)                Context-aware help
:quit       (:exit, :q)         Exit
Navigation:
Up/Down or j/k      Move up/down
Space or Enter      View details
Esc                 Go back
/ (slash)           Local search/filter
Page Up/Down        Scroll by page
Home/End or g/G     Jump to start/end
Resource Actions:
:create (:new, :add)            Create resource
:delete (:remove, :rm)          Delete selected resource
:start (:boot)                  Start server
:stop (:shutdown)               Stop server
:restart (:reboot)              Restart server
All commands work from anywhere. Tab completion shows you what's available. Command history (up arrow) recalls previous commands. The interface is designed to teach itself as you use it.